Staging out links to your queue is easier than you think. There are several different ways this can be done. Here are some of the most popular ways to connect with a Chime queue:
| Add the Queue dispatcher to your Lync/S4B buddy list | Lync/S4B | Easiest | ||
| Allowing Federated users access to Chime | Lync/S4B | Easy | ||
| Click-to-chat button on an internal web page | Web Client | Intermediate | ||
| Expose the Chime web client outside your network | Web Client | Difficult | ||
| Add a click-to-chat link in your email signature that starts a Lync/S4B chat | Lync/S4B | Easy | ||
| Add a click-to-chat link to the web client in your email signature | Web Client | Easy | ||
| HTML web link to the web client | Web Client | Easy | ||
| HTML link that initiates a Lync/S4B chat | Lync/S4B | Easy | ||
| Click-to-chat button on an external web page using ChimeHub as a proxy | ChimeHub | Intermediate | ||
| How to set up and use Skill Tag Routing | Web Client | Intermediate | ||
| How to add custom information about the guest | Web Client | Intermediate |
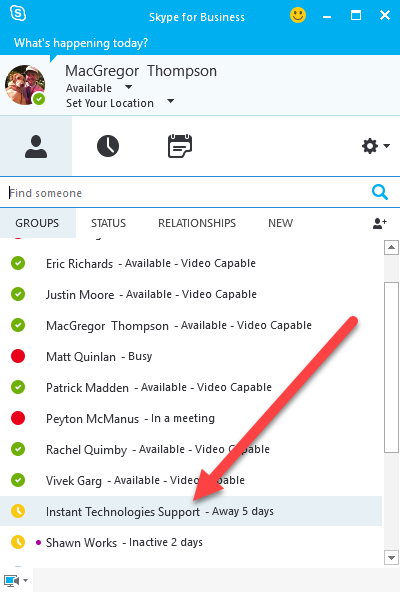
If your users will be using Lync/Skype for Business, this is a great choice. It's not only the easiest but the quickest as well. A user can simply start a chat with the dispatcher with will then route that chat to an agent in the queue.
Example: sip:servicedesk.english@instant-tech.com
| Pros: | Quickest and easiest. Users don't have to go to a web page to get help. |
|---|---|
| Cons: | Some features are unavailable when not using the web client. E.g. Session rating. |
Federated users outside your organization can connect to Chime via Lync/S4B the same way as users inside the organization. All they have to do is initiate a Lync/S4B chat with the queue dispatcher and they will be routed to a Chime agent.
Example: sip:instantsupport@instant-tech.com
| Pros: | Quickest and easiest. Users don't have to go to a web page to get help. |
|---|---|
| Cons: | Some features are unavailable when not using the web client. E.g. Session rating. |
This button can either point to the web client, or be used to open a Lync to Lync chat with the dispatcher.
| Pros: | More control over where users can come from. Can link to the web client or the Dispatcher's sip uri which would start a Lync/S4B chat. |
|---|---|
| Cons: | Not as easy as simply adding the dispatcher to your Lync/S4b buddy list. |
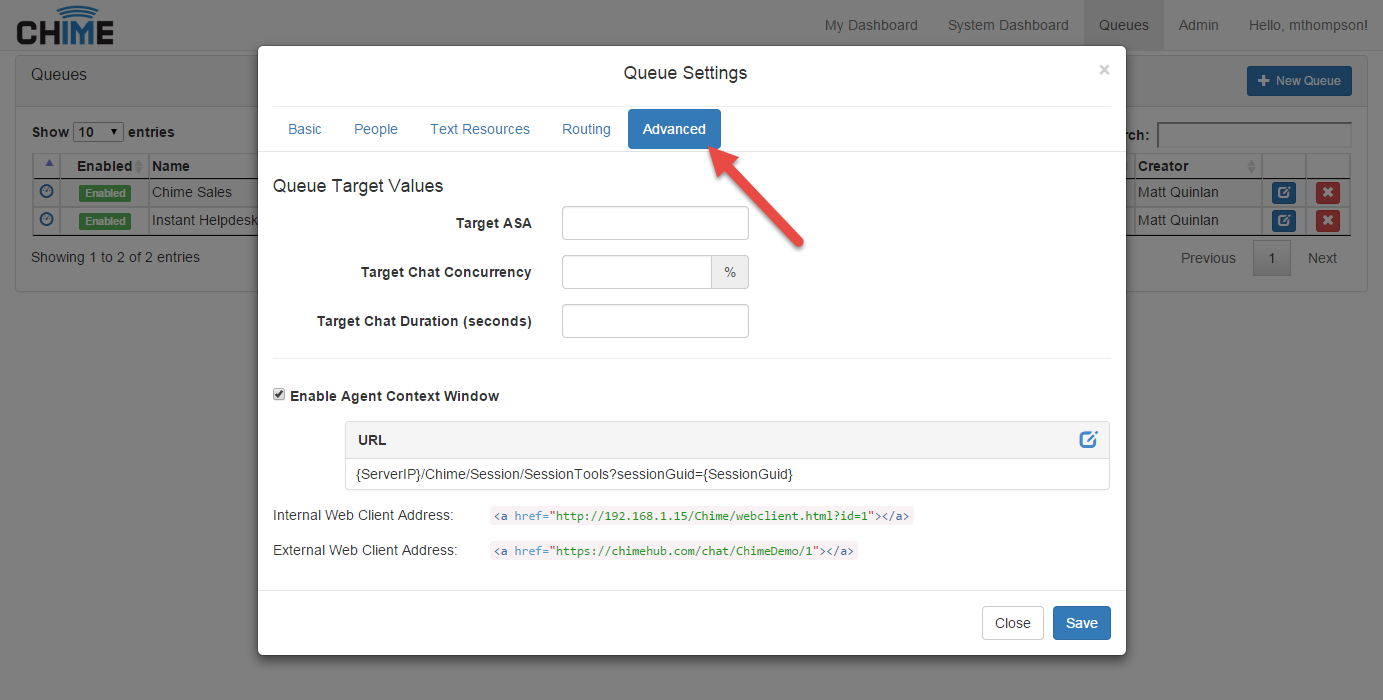
The web client is accessed by opening a browser window to the url for the webClient.html
file, with parameters for the queue to hit, and optionally the user connecting to the chat.
The URL for the web client might look something like: http://Chime.server/Chime/webclient?id=1
Note* - Chime.server is a reference to your internal IP address where Chime is stationed
To open the web client, first we need to know a couple of values.
| Variable | Where To Locate |
|---|---|
| chatURL |
The Internal Web Client Address found in Queue Settings / Advanced
Ex: http://Chime.server/Chime/webclient?id=1 |
| queueId | The Integer at the end of the Internal Web Client Address Ex: http://Chime.server/Chime/webclient?id=1 |
<button id="chat-btn" data-queueid="1">Chat Now!</button>

<!--Using the data-queueid attribute allows the use of the same script for all buttons.
Changing the data-queueid will change which queue the button is referencing. -->
<button id="chat-btn" data-queueid="1">Chat Now!</button>
<button id="chat-btn" data-queueid="2">Chat Now!</button>
<button id="chat-btn" data-queueid="3">Chat Now!</button>
$(document).ready(function() {

    // In this example, we leave off the last number in the URL which signifies the queueId.
    // It will be concatenated when we call our startChat() function.
    var chatURL = "http://Chime.server/Chime/webclient?id=";

    var chatWindow = null;
    var windowFeatures = "width=600,height=600,locationbar=no,toolbar=no,menubar=no,resizable=yes";


   function startChat(queueId){
        if (chatWindow === null || chatWindow.closed) {
            chatWindow = window.open(
                chatURL + queueId,
                "LetsChat",
                windowFeatures
            );
        }else {
            chatWindow.focus();
        }
    }

   // Call function to start chat
    $('#chat-btn').click(function() {
        startChat($(this).data('queueid'))
    });
});
$(document).ready(function() {
    var iframeChatWindow = null;

    var startiframeChat = function() {
        if(iframeChatWindow === null) {
            $('#input-iframe').html('<iframe src="http://Chime.server/Chime/webclient?id=1" id="chat"></iframe>');
        }
        iframeChatWindow = true;
    };

    $(#chat-btn).click(function() {
        startiframeChat();
    });

});
If you want to allow access to the Chime web client outside your organization, there will be some additional setup required. You can place a click-to-chat button on an external web page by using one of the options below.
| Chime Hub |
Place a click-to-chat button on a DMZ exposed web page that uses
Chime Hub as a proxy.
Chime Hub provides a cloud based service to quickly extend your Chime on-premise installation to support external websites and portals. This is the easiest of the options to set up, but some features are limited because of security reasons. There is more on this below. |
|
|---|---|---|
| Reverse Proxy |
Place a click-to-chat button on a DMZ exposed web page that uses a
reverse proxy to communicate back to your internal Chime
server.
Using a reverse proxy would allow your web client to have all of its features, but is a little more difficult to set up. Click the button on the right to see a PDF of the steps for setting up an Apache reverse proxy server. |
Learn More |
| Portal Page in DMZ |
Place a click-to-chat button on a DMZ exposed web page.
A benefit of this choice is it gives you the entire web client feature set, however, it is not as secure as the previous 2 options. |
|
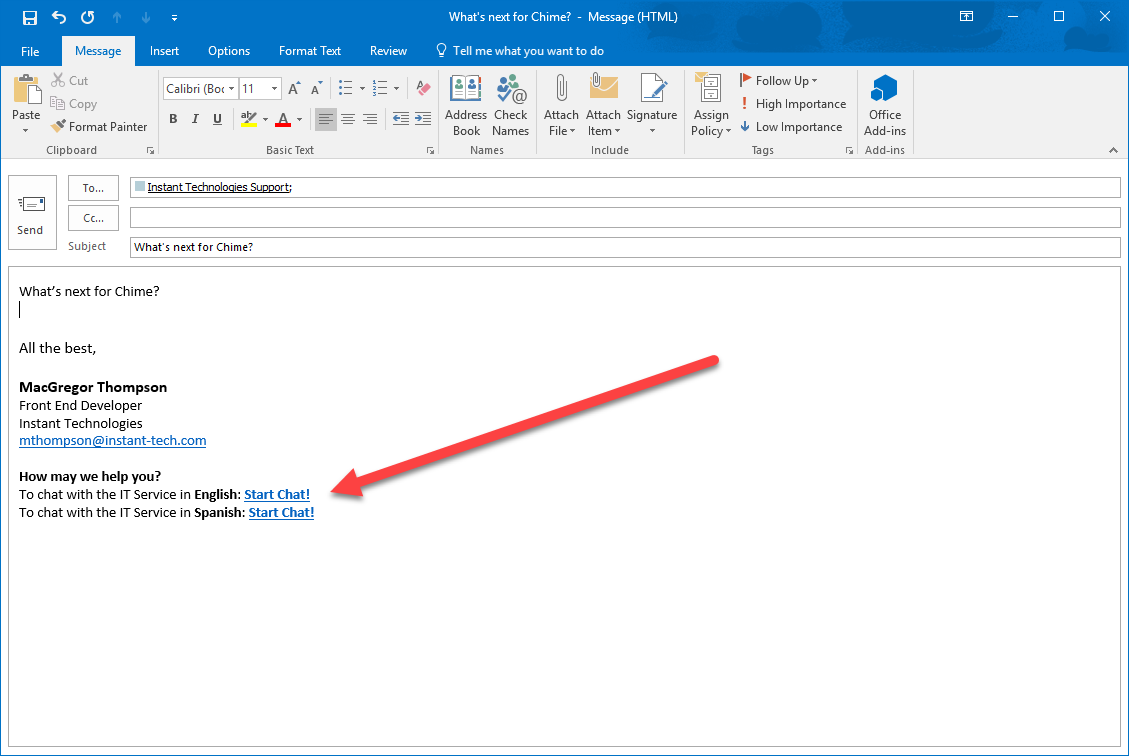
This is a great way to expose your help desk to people who use Lync/S4B directly from your email. It is no different than composing a web link on a web page, but is just inside an email signature. We will want to use the dispatcher's SIP address in the link.
Example: sip:support.english@instant-tech.com or IM:<sip:support.spanish@instant-tech.com>
Note - If the Start Chat! links below do not open a Lync/S4B chat window, then this feature will not work for you.
All the best,
MacGregor Thompson
Front End Developer
Instant Technologies
mthompson@instant-tech.com
How may we help you?
To chat with the IT Service in English:
Start Chat!
To chat with the IT Service in Spanish:
Start Chat!
This is a great way to expose your help desk to people directly from your email. It is no different than composing a web link on a web page, but is just inside an email signature.
Example: https://chime.instant-tech.com/Chime/webclient?id=2
Note - The number in ?id=2 represents the queue ID
All the best,
MacGregor Thompson
Front End Developer
Instant Technologies
mthompson@instant-tech.com
How may we help you?
To chat with the IT Service in English:
Start Chat!
To chat with the IT Service in Spanish:
Start Chat!
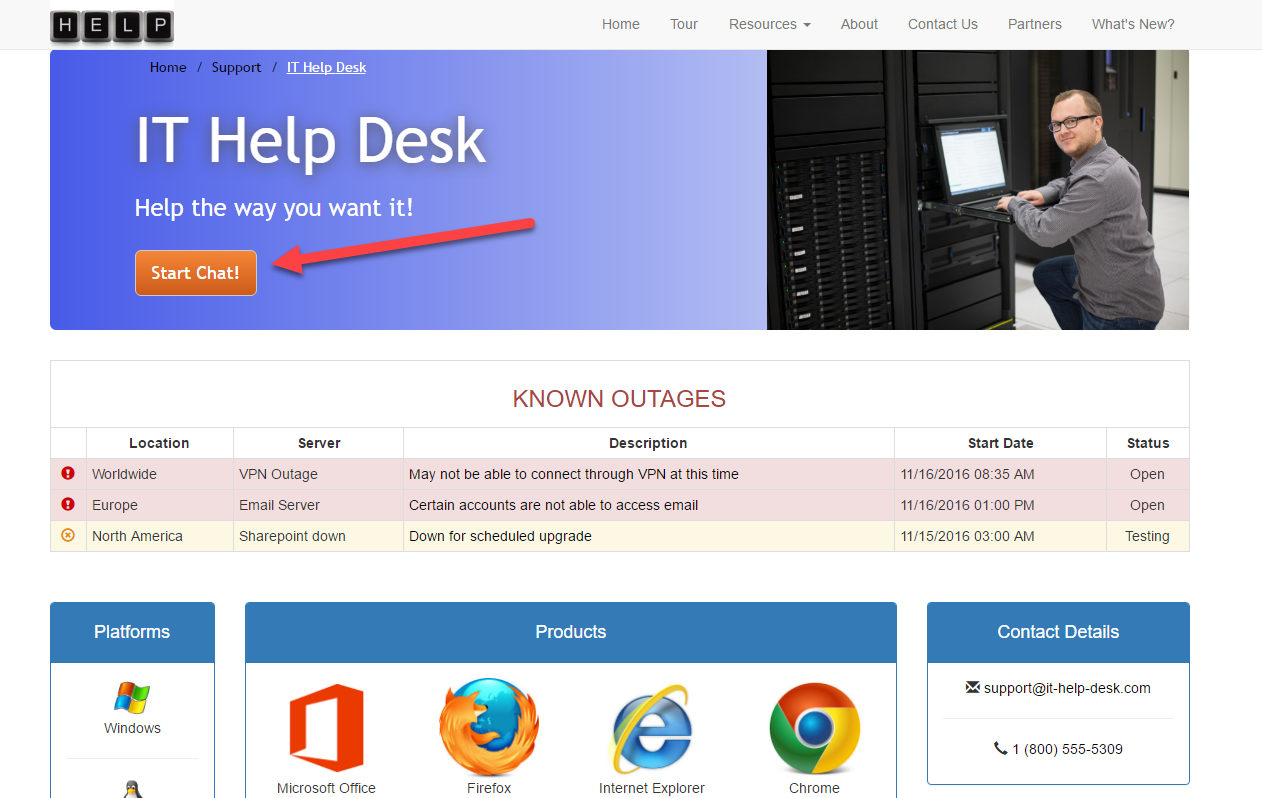
This is probably the simplest example of using the web client. All you have to do is add a web link that points to the web client url.
Demo example:
To get help, click Chat Now!
<!-- The Number in ?id=<Number> below represents the Queue ID -->
 <a href="https://chime.instant-tech.com/Chime/webclient?id=2">Chat Now!</a>

<!-- Be sure to include target="_blank" if you want it to open in a new browser window -->
<a href="https://chime.instant-tech.com/Chime/webclient?id=2" target="_blank">Chat Now!</a>
This is probably the simplest example of initiating a Lync/S4B chat from a web page. All you have to do is add a web link that points to the SIP address of the queue's dispatcher.
Example: sip:support.english@instant-tech.com or IM:<sip:support.spanish@instant-tech.com>
Demo: Chat Now!
Note - If the link above does not open a Lync/S4B chat window, then this feature will not work for you.
<a href="sip:instantsupport@instant-tech.com">Chat Now!</a>

<a href="IM:<sip:instantsupport@instant-tech.com>">Chat Now!</a>
Chime Hub provides a cloud based service to quickly extend your Chime on-premise installation to support external websites and portals. You no longer need to deploy machines in a DMZ, proxy servers, or other complex server configurations – Chime Hub connects you quickly with external sites.
| Pros: | Allows you to expose your queue to the DMZ while keeping Chime behind your company's firewall. |
|---|---|
| Cons: | The ChimeHub web client does not contain all the features as the regular web client for security reasons. |
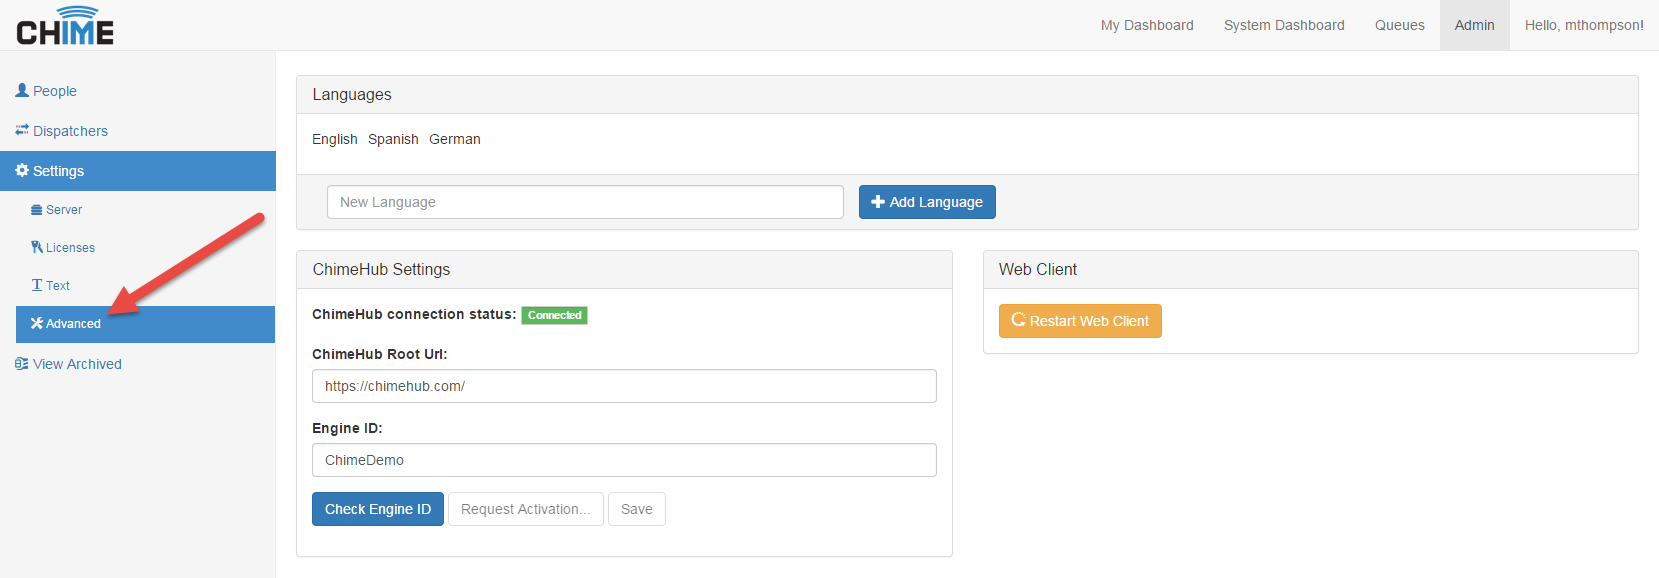
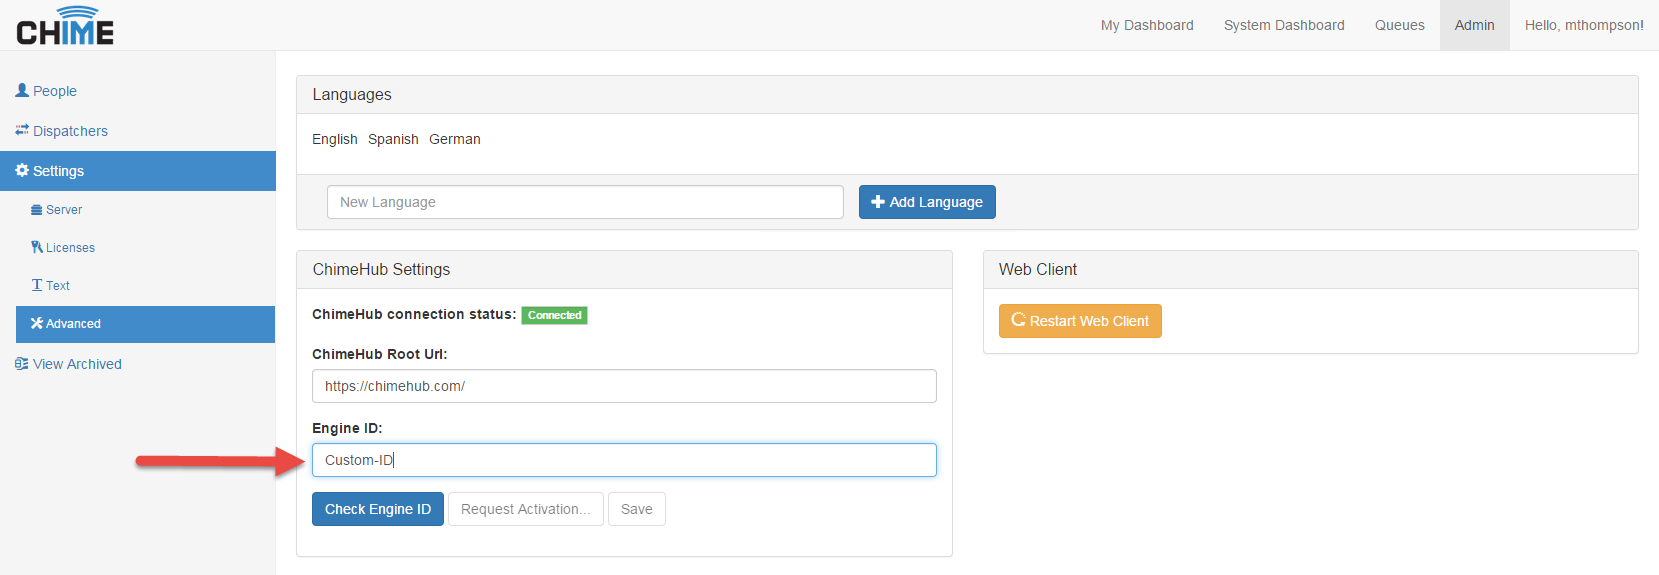
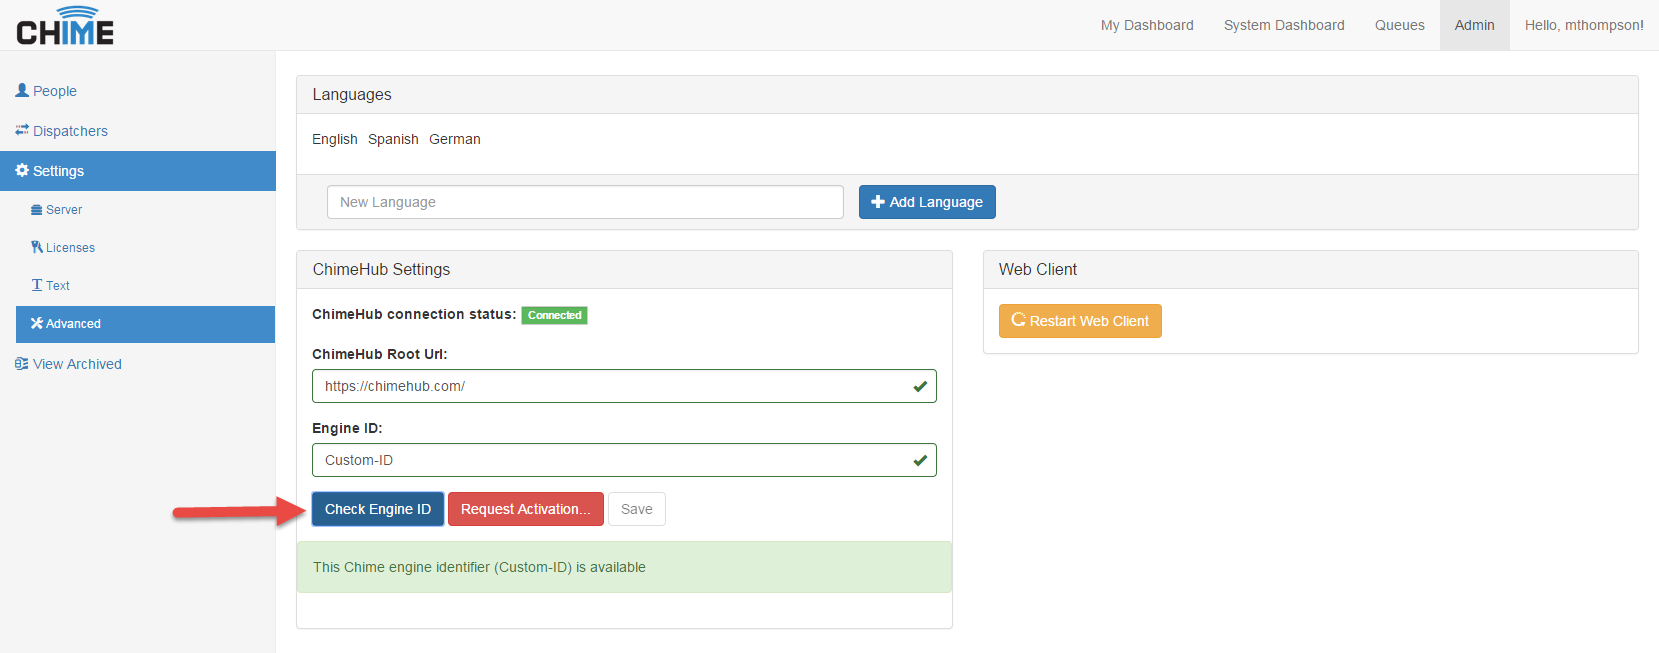
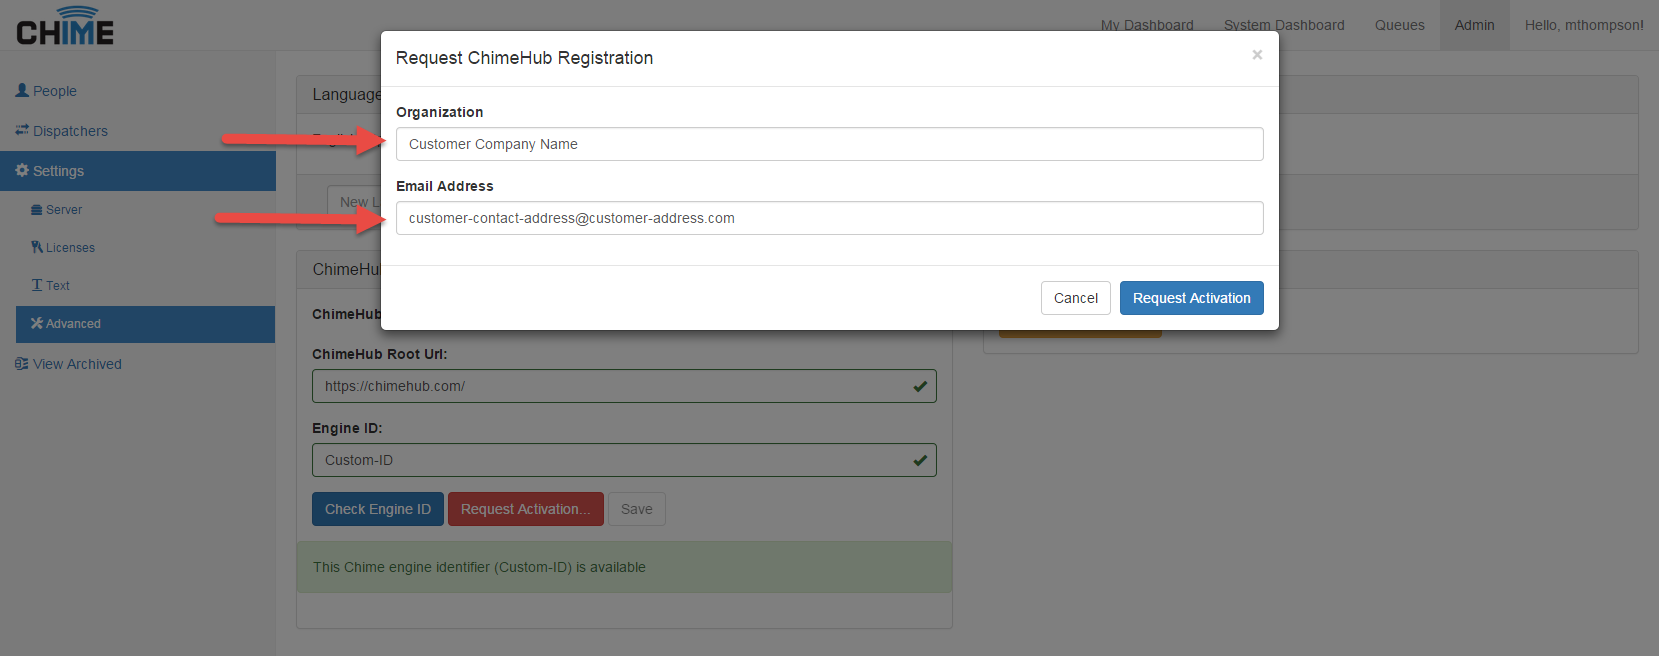
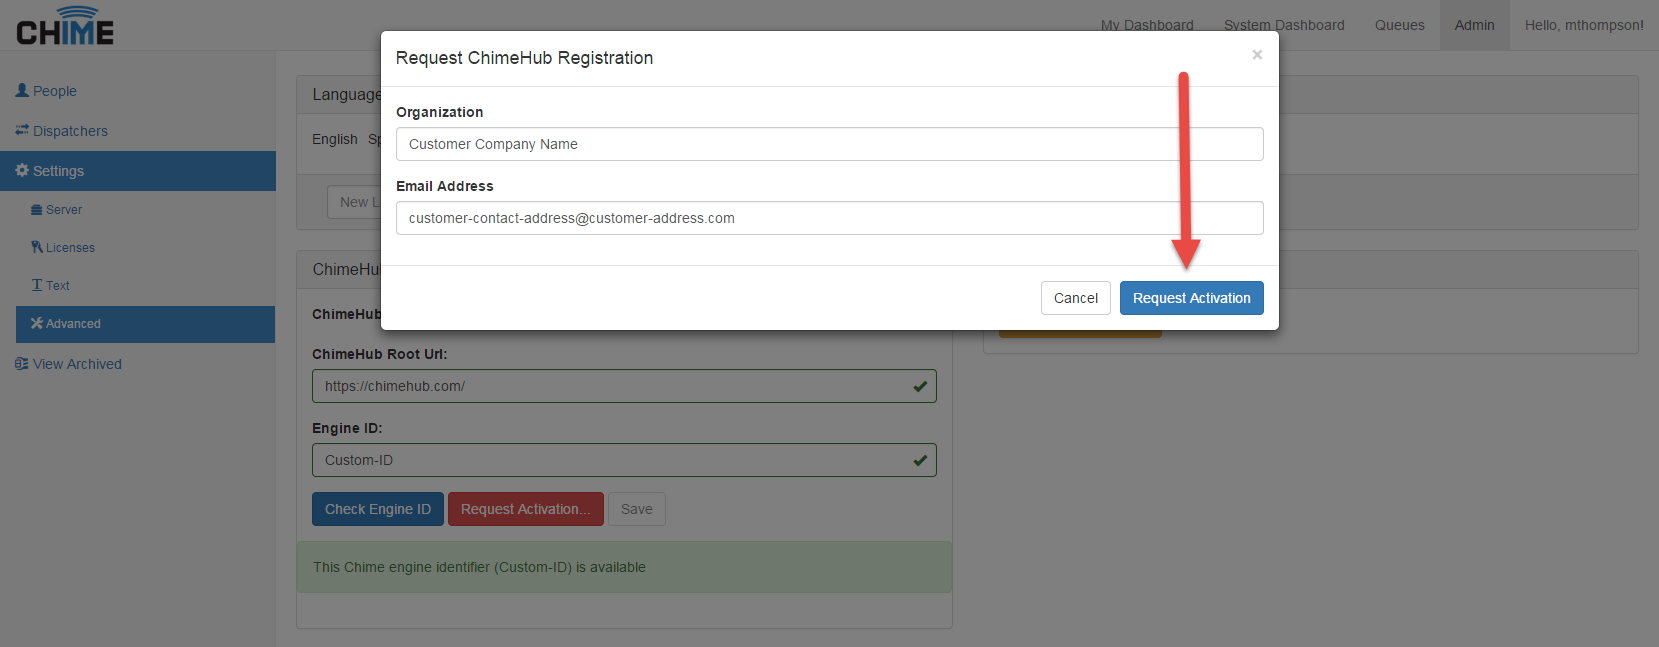
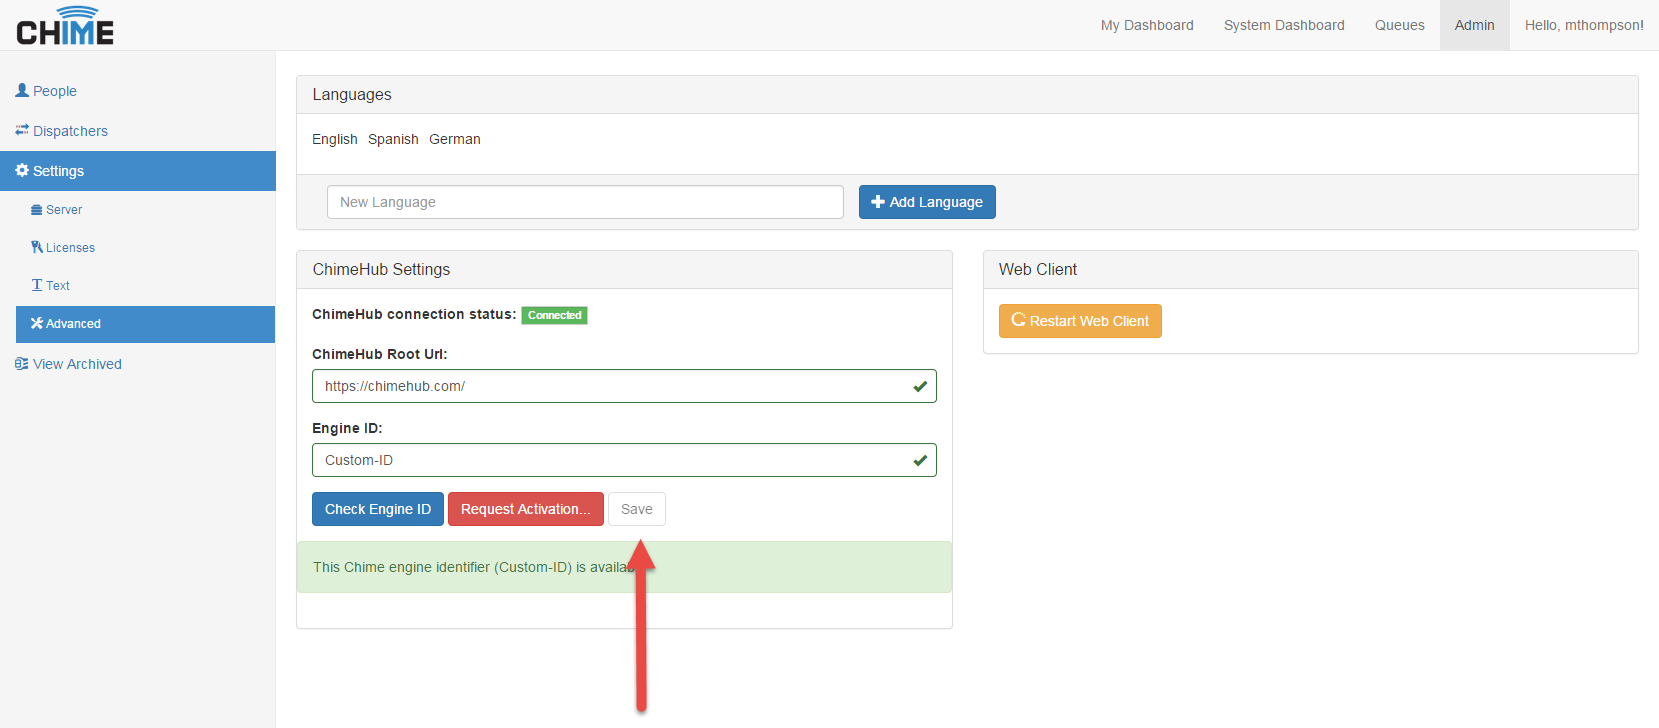
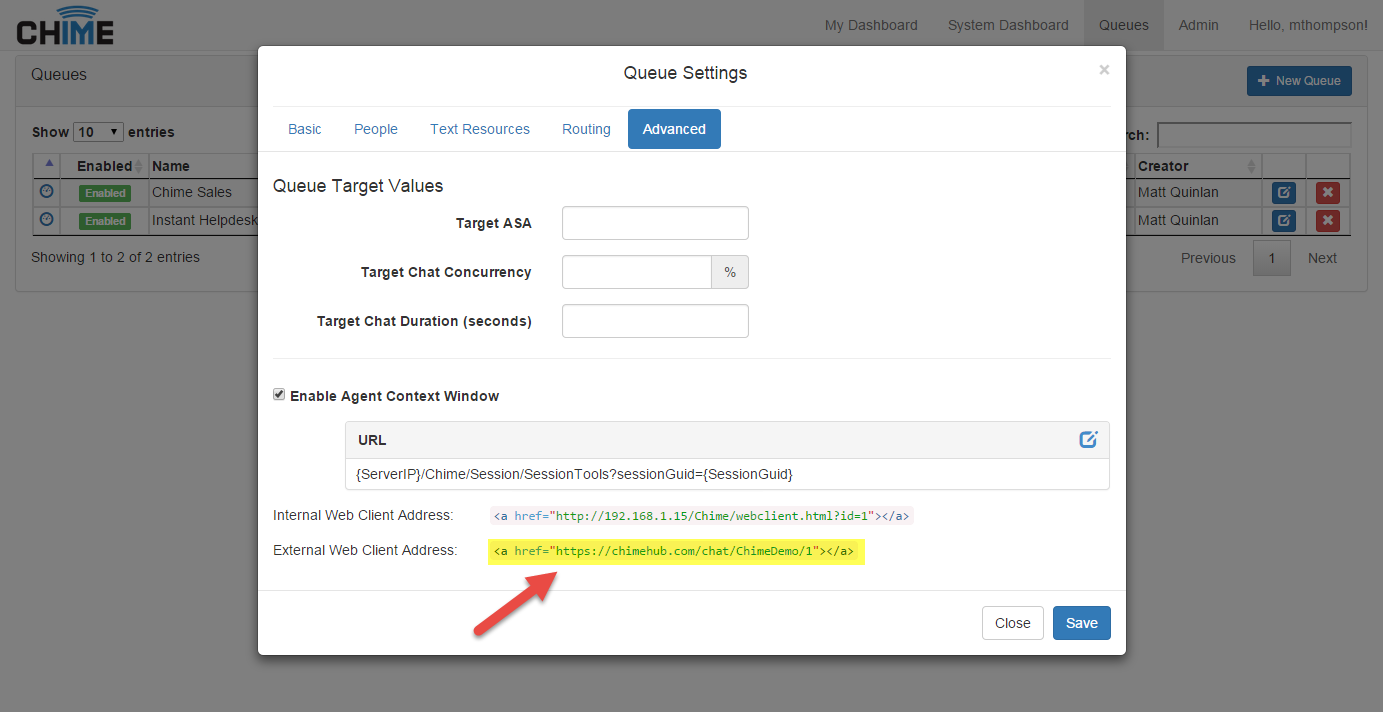
To stage out a click-to-chat link to route conversations through ChimeHub, you will need two pieces of information:
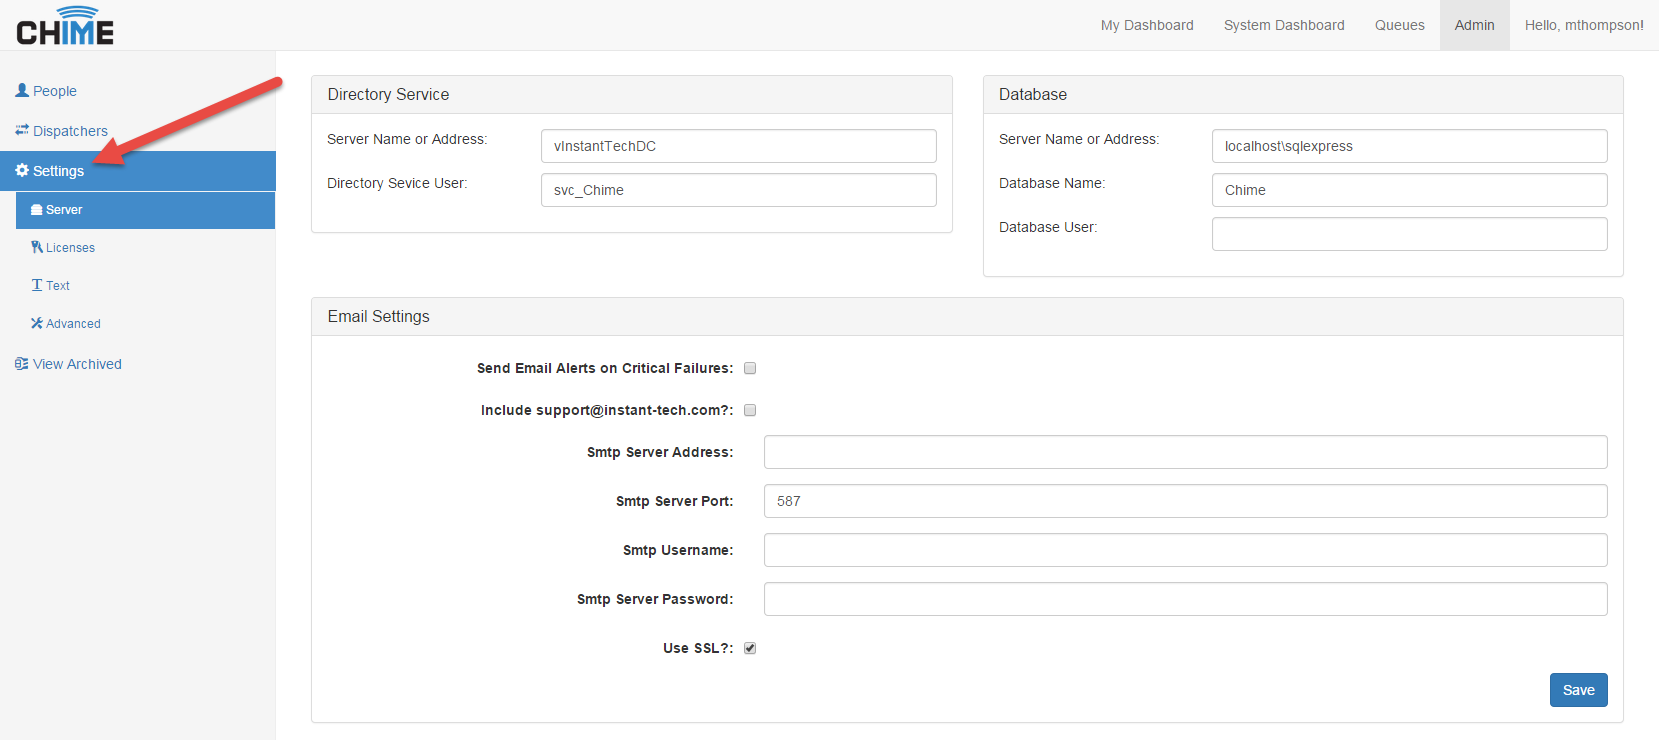
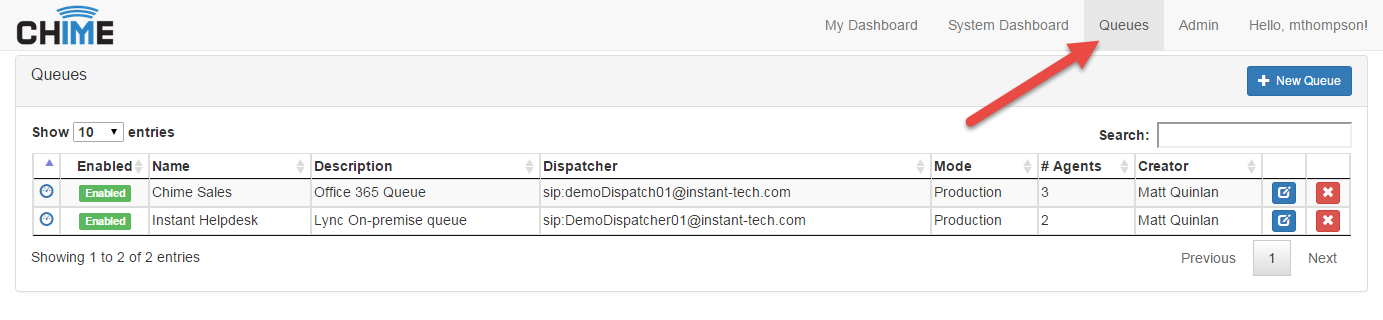
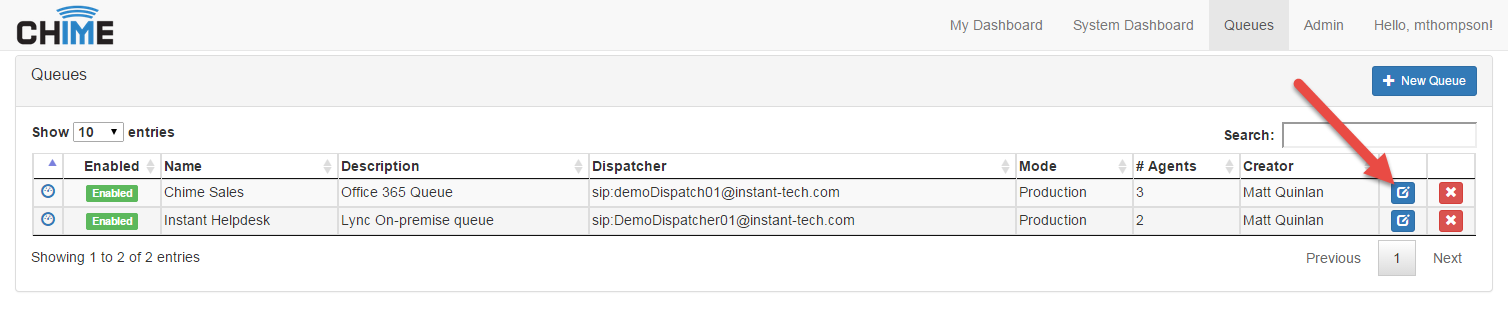
The engine name is the name registered with the ChimeHub service, in the Admin > Advanced settings area within the Chime application. The Queue ID is an integer representing the internal ID of the Queue in your Chime system. This can be seen retrieved from the Advanced tab in the Queue Settings for the queue, where Chime displays the URL needed to open a chat window through ChimeHub.
Note: User must have admin rights to follow instructions below.
For a PDF of the instructions click here » Staging_External_Web_Client_With_Chime_Hub.pdf
A click to chat button might look like this:
The markup might look like this:
| Method | isQueueAvailable |
| Parameters | engineID (string), queueID (int) |
| Response |
|
| Sample (using jQuery) |
|
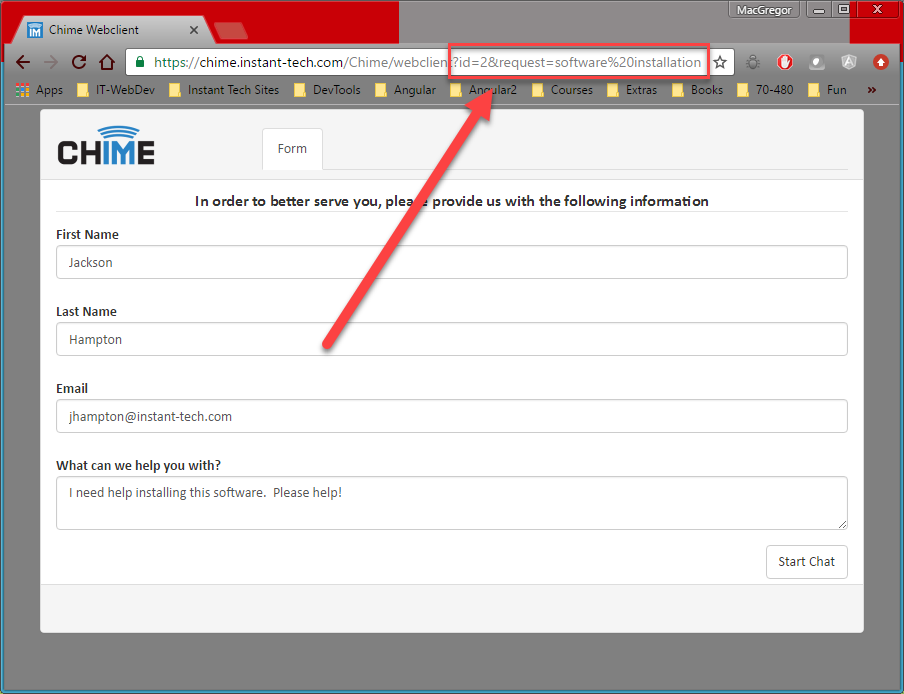
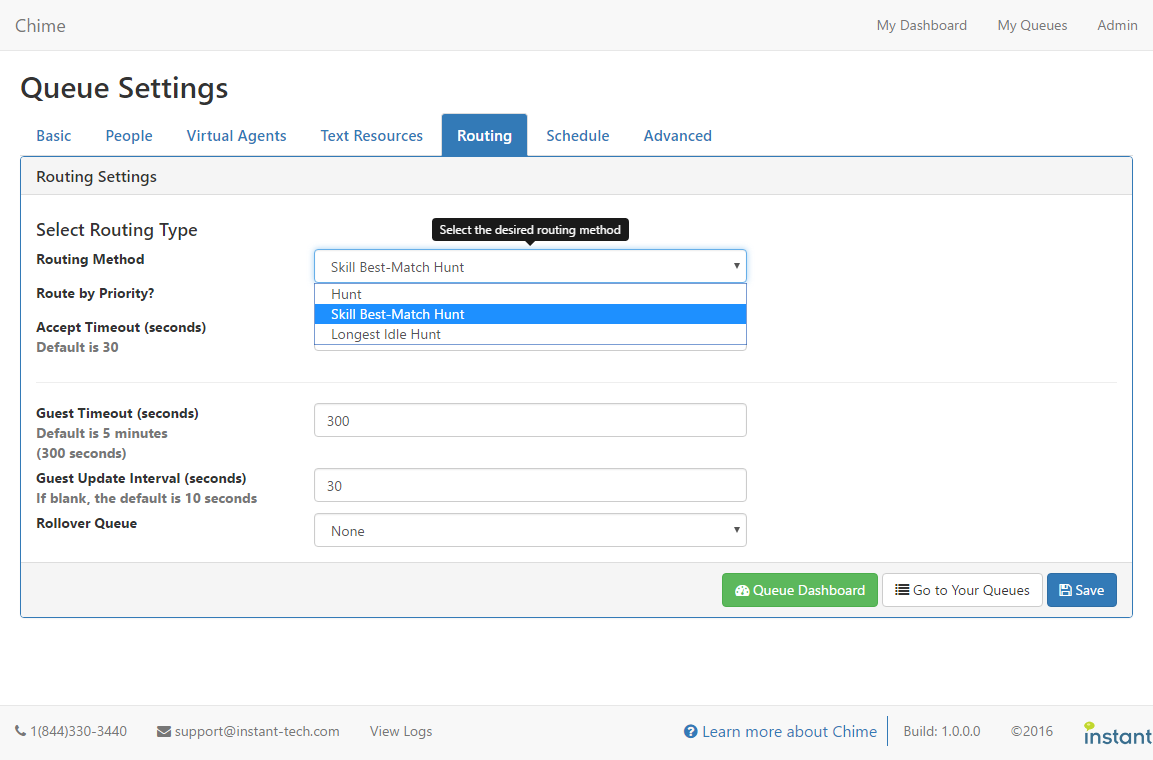
Skill Tag Routing, or specifically Skill Best-Match Hunt, is one of Chime's 3 routing methods that will route guests with specific problems to agents who have matching skill sets (tags). For example, a guest who needs help with their hardware starts a chat with the queue. Chime will first try and route to an available agent with the matching hardware skill tag before routing to the next available agent. Adding custom information to the inbound session is easier than you think. All you need to do is add it to the URL via one or more query string parameters. It is through this mechanism that the web client grabs the queue ID and routes the guest to the appropriate queue. For example, with the URL https://chime.instant-tech.com/Chime/webclient?id=2, the web client knows to route the guest to the queue with an ID of 2.
The Chime web client will automatically grab all query string parameters and display them to the agent with the other information in the MetaData tab of the Agent Context Window. This means you are not limited to just one or two but can add several different parameters if you wish.
Adding query string parameters can be done in one of two ways; Adding it directly on the URL in the link or add it via javascript. In the examples that follow we are going to demonstrate how each of these works.
See the screenshots for a look at how query parameters in the example URL and others below will be rendered to the agent in the Agent Context Window.
Example URL: https://chime.instant-tech.com/Chime/webclient?id=2&request=software%20installation
| ? |
The beginning of a query strings is denoted by the ? (question mark).
Everything before is deemed part of the URL path to the web page itself.
E.g. ?id=2&request=software%20installation |
|---|---|
| & |
The & (ampersand) is used to separate sets of query string parameters.
Notice how we have 2 query string key/value pairs in the example.
E.g. ?id=2&skillTags=password%20reset&request=software%20installation |
| %20 |
Spaces are translated into %20 in a URL.
This is important to remember if you are adding the query string parameters directly to the URL via HTML.
A space in a URL can cause the page not load correctly or even at all.
Some browsers are smart enough to replace a space before trying to load a URL,
but it's good practice to replace all spaces with %20 beforehand.
E.g. ?id=2&request=software%20installation |
These parameters include:
skillTags can also be used for skill tag routing. (More on routing can be found here) Skill tag routing can be used in one of two ways:
Now that we have more information, let's move forward with our example!
Example URL: https://chime.instant-tech.com/Chime/webclient?id=2&request=software%20installation
In this example we are adding the query string parameter directly to the URL of the web link. Both links have the same URL and open the web client in a new window (target="_blank") and add the query string parameter &request=software%20installation.
Example Web Links:
<!-- This code corresponds to the two web links above....Notice we replaced the space with %20-->
<a href="https://chime.instant-tech.com/Chime/webclient?id=2&request=software%20installation" target="_blank">
    Start Chat!
</a>

<a href="https://chime.instant-tech.com/Chime/webclient?id=2&request=software%20installation" target="_blank">
    Software Installation
</a>
In this example, we will launch the web client via JavaScript and add the query string corresponding to the button we click. Unlike the first example, this one will launch the web client in a new window with different query string parameters.
Note - While both examples start a chat with the same queue, they demonstrate how different queue ID's can be used to initiate chats with different queues.
Example Buttons:
<!--This code corresponds to the two buttons above.
    Notice we are storing values for both the queue ID and the request in an HTML data attributes.-->

<button class="btn btn-primary start-chat" data-queueid="2" data-request="software installation">
    Start Chat
</button>

<button class="btn btn-primary start-chat" data-queueid="2" data-request="hardware">Hardware</button>
(function() {

    //base URL for the web client WITHOUT a queue ID
    var chatURL = "https://chime.instant-tech.com/Chime/webclient";
    var chatWindow = null;

    //these are the features for the new window we are going to open and can be changed if you want
    var windowFeatures = "width=600,height=600,locationbar=no,toolbar=no,menubar=no,resizable=yes";

    //When we call the startChat function, we want to first make sure the chatWindow doesn't exist
    //or has been closed....otherwise bring that window into focus and prevent duplicate chat windows
    function startChat(queueId, request){
        if (chatWindow === null || chatWindow.closed) {
            //Compose the URL with the parameters
            var fullURL = chatURL + '?id=' + queueId + '&request=' + request;
            chatWindow = window.open(
                fullURL,
                "LetsChat",
                windowFeatures
            );
        }else {
            chatWindow.focus();
        }
    }

    // Add an event listener to each element with the class "start-chat" to call
    //our startChat function when the button is clicked
    var buttons = document.getElementsByClassName('start-chat');
    for (var i = 0; i < buttons.length; i++) {
        buttons[i].addEventListener('click', function() {
            //Grab the values for queueid and request from the button that was clicked
            var id = this.dataset.queueid;
            var req = this.dataset.request;
            //Start the chat......Yay!
            startChat(id, req);
        });
    }
})();
$(function() {

   //base URL for the web client WITHOUT a queue ID
    var chatURL = "https://chime.instant-tech.com/Chime/webclient";
    var chatWindow = null;

    //these are the features for the new window we are going to open and can be changed if you want
    var windowFeatures = "width=600,height=600,locationbar=no,toolbar=no,menubar=no,resizable=yes";

    //When we call the startChat function, we want to first make sure the chatWindow doesn't exist
    //or has been closed....otherwise bring that window into focus and prevent duplicate chat windows
    function startChat(queueId, request){
        if (chatWindow === null || chatWindow.closed) {
            //Compose the URL with the parameters
            var fullURL = chatURL + '?id=' + queueId + '&request=' + request;
            chatWindow = window.open(
                fullURL,
                "LetsChat",
                windowFeatures
            );
        }else {
            chatWindow.focus();
        }
    }

    //With jQuery there is no need to manually add event listeners to each button as jQuery does that
    //for us behind the scenes.

    $('.start-chat').click(function() {
        //Grab the values for queueid and request from the button that was clicked
        var id = $(this).data('queueid');
        var req = $(this).data('request');
        //Start the chat......Yay!
        startChat(id, req);
    });
});
Adding custom information to the inbound session is easier than you think. All you need to do is add it to the URL via one or more query string parameters. It is through this mechanism that the web client grabs the queue ID and routes the guest to the appropriate queue. For example, with the URL https://chime.instant-tech.com/Chime/webclient?id=2, the web client knows to route the guest to the queue with an ID of 2.
The Chime web client will automatically grab all query string parameters and display them to the agent with the other information in the MetaData tab of the Agent Context Window. This means you are not limited to just one or two but can add several different parameters if you wish.
Adding query string parameters can be done in one of two ways; Adding it directly on the URL in the link or add it via javascript. In the examples that follow we are going to demonstrate how each of these works.
See the screenshots for a look at how query parameters in the example URL and others below will be rendered to the agent in the Agent Context Window.
Example URL: https://chime.instant-tech.com/Chime/webclient?id=2&request=software%20installation
| ? |
The beginning of a query strings is denoted by the ? (question mark).
Everything before is deemed part of the URL path to the web page itself.
E.g. ?id=2&request=software%20installation |
|---|---|
| & |
The & (ampersand) is used to separate sets of query string parameters.
Notice how we have 2 query string key/value pairs in the example.
E.g. ?id=2&skillTags=password%20reset&request=software%20installation |
| %20 |
Spaces are translated into %20 in a URL.
This is important to remember if you are adding the query string parameters directly to the URL via HTML.
A space in a URL can cause the page not load correctly or even at all.
Some browsers are smart enough to replace a space before trying to load a URL,
but it's good practice to replace all spaces with %20 beforehand.
E.g. ?id=2&request=software%20installation |
These parameters include:
skillTags can also be used for skill tag routing. (More on routing can be found here) Skill tag routing can be used in one of two ways:
Now that we have more information, let's move forward with our example!
Example URL: https://chime.instant-tech.com/Chime/webclient?id=2&request=software%20installation
In this example we are adding the query string parameter directly to the URL of the web link. Both links have the same URL and open the web client in a new window (target="_blank") and add the query string parameter &request=software%20installation.
Example Web Links:
<!-- This code corresponds to the two web links above....Notice we replaced the space with %20-->
<a href="https://chime.instant-tech.com/Chime/webclient?id=2&request=software%20installation" target="_blank">
    Start Chat!
</a>

<a href="https://chime.instant-tech.com/Chime/webclient?id=2&request=software%20installation" target="_blank">
    Software Installation
</a>
In this example, we will launch the web client via JavaScript and add the query string corresponding to the button we click. Unlike the first example, this one will launch the web client in a new window with different query string parameters.
Note - While both examples start a chat with the same queue, they demonstrate how different queue ID's can be used to initiate chats with different queues.
Example Buttons:
<!--This code corresponds to the two buttons above.
    Notice we are storing values for both the queue ID and the request in an HTML data attributes.-->

<button class="btn btn-primary start-chat" data-queueid="2" data-request="software installation">
    Start Chat
</button>

<button class="btn btn-primary start-chat" data-queueid="2" data-request="hardware">Hardware</button>
(function() {

    //base URL for the web client WITHOUT a queue ID
    var chatURL = "https://chime.instant-tech.com/Chime/webclient";
    var chatWindow = null;

    //these are the features for the new window we are going to open and can be changed if you want
    var windowFeatures = "width=600,height=600,locationbar=no,toolbar=no,menubar=no,resizable=yes";

    //When we call the startChat function, we want to first make sure the chatWindow doesn't exist
    //or has been closed....otherwise bring that window into focus and prevent duplicate chat windows
    function startChat(queueId, request){
        if (chatWindow === null || chatWindow.closed) {
            //Compose the URL with the parameters
            var fullURL = chatURL + '?id=' + queueId + '&request=' + request;
            chatWindow = window.open(
                fullURL,
                "LetsChat",
                windowFeatures
            );
        }else {
            chatWindow.focus();
        }
    }

    // Add an event listener to each element with the class "start-chat" to call
    //our startChat function when the button is clicked
    var buttons = document.getElementsByClassName('start-chat');
    for (var i = 0; i < buttons.length; i++) {
        buttons[i].addEventListener('click', function() {
            //Grab the values for queueid and request from the button that was clicked
            var id = this.dataset.queueid;
            var req = this.dataset.request;
            //Start the chat......Yay!
            startChat(id, req);
        });
    }
})();
$(function() {

   //base URL for the web client WITHOUT a queue ID
    var chatURL = "https://chime.instant-tech.com/Chime/webclient";
    var chatWindow = null;

    //these are the features for the new window we are going to open and can be changed if you want
    var windowFeatures = "width=600,height=600,locationbar=no,toolbar=no,menubar=no,resizable=yes";

    //When we call the startChat function, we want to first make sure the chatWindow doesn't exist
    //or has been closed....otherwise bring that window into focus and prevent duplicate chat windows
    function startChat(queueId, request){
        if (chatWindow === null || chatWindow.closed) {
            //Compose the URL with the parameters
            var fullURL = chatURL + '?id=' + queueId + '&request=' + request;
            chatWindow = window.open(
                fullURL,
                "LetsChat",
                windowFeatures
            );
        }else {
            chatWindow.focus();
        }
    }

    //With jQuery there is no need to manually add event listeners to each button as jQuery does that
    //for us behind the scenes.

    $('.start-chat').click(function() {
        //Grab the values for queueid and request from the button that was clicked
        var id = $(this).data('queueid');
        var req = $(this).data('request');
        //Start the chat......Yay!
        startChat(id, req);
    });
});


 Screenshots (3)