Creating and using a bot with Chime is easier than you think. There are several different ways this can be done. Here are some examples to help you get started:
| # | Description | Difficulty | |
|---|---|---|---|
| Simple bot that asks which Chime queue you want to start a chat with and then routes you | Easy |
| # | Description | Bot Channels | Difficulty | |
|---|---|---|---|---|
| Deploying the Bot to your web page using the out-of-the-box Web Chat from Microsoft's Bot Framework | Web Chat | Easy | ||
| Building a custom web client using the Direct Line API | Direct Line | Difficult |
The Bot Framework has documentation for developing bots in both C# and Node.js, but we will be focusing on C# in this example.
Follow Microsoft's documentation above to build and deploy a simple echo bot. We'll modify this out-of-the-box bot next.
OK...now that you have a simple echo bot up and running. Let's make our simple code changes. The following will demonstrate how to create an Adaptive Card and add two OpenUrlActions that correspond to our Sales and Support queues.
using System.Threading.Tasks;
using System.Web.Http;
using Microsoft.Bot.Connector;
using Microsoft.Bot.Builder.Dialogs;
using System.Web.Http.Description;
using System.Net.Http;
using System;
using System.Collections.Generic;
using System.Linq;
// Make sure to import the Microsoft.AdaptiveCards NuGet package
using AdaptiveCards;
using SimpleEchoBot.Dialogs;

namespace SimpleEchoBot.Controllers
{
  [BotAuthentication]
  public class MessagesController : ApiController
  {
    /// <summary>
    /// POST: api/Messages
    /// receive a message from a user and send replies
    /// </summary>
    /// <param name="activity"></param>
    [ResponseType(typeof(void))]
    public virtual async Task<HttpResponseMessage> Post([FromBody] Activity activity)
    {
      // check if activity is of type message
      if (activity != null && activity.GetActivityType() == ActivityTypes.Message)
      {
        await Conversation.SendAsync(activity, () => new EchoDialog());
      }
      else
      {
        HandleSystemMessage(activity);
      }
      return new HttpResponseMessage(System.Net.HttpStatusCode.Accepted);
    }
    private Activity HandleSystemMessage(Activity message)
    {
      if (message.Type == ActivityTypes.DeleteUserData)
      {
        // Implement user deletion here
        // If we handle user deletion, return a real message
      }
      *** The following code block is where you will make you changes ***
      else if (message.Type == ActivityTypes.ConversationUpdate)
      {
        // Handle conversation state changes, like members being added and removed
        // Use Activity.MembersAdded and Activity.MembersRemoved and Activity.Action for info
        // Not available in all channels

        // Check that there was a member added to the conversation
        if (message.MembersAdded.Any(o => o.Id == message.Recipient.Id))
        {
          // Instantiate a bot connector (this is the middle man for which all bot communications occur with the various channels)
          ConnectorClient connector = new ConnectorClient(new Uri(message.ServiceUrl));

          // Create a new reply activity...the text passed in will be the prompt for the card
          Activity reply = message.CreateReply("Please select one of the following options...");
          reply.Attachments = new List<Attachment>();

          // Create a new Adaptive card
          AdaptiveCard card = new AdaptiveCard();

          // Create a new OpenUrlAction and set the url to the Sales queue web client
          card.Actions.Add(new OpenUrlAction()
          {
            Url = "https://staging-it-chimehub-web.azurewebsites.net/chat/chime.instant-tech.com/2",
            Title = "Chat with Sales"
          });
          // And now one for the Support queue web client
          card.Actions.Add(new OpenUrlAction()
          {
            Url = "https://staging-it-chimehub-web.azurewebsites.net/chat/chime.instant-tech.com/3",
            Title = "Chat with Support"
          });

          // Build a new Attachment with our card object
          Attachment attachment = new Attachment()
          {
            ContentType = AdaptiveCard.ContentType,
            Content = card
          };

          // Add the new card attachment to our reply
          reply.Attachments.Add(attachment);

          // Send the reply back to the user
          connector.Conversations.ReplyToActivityAsync(reply);
        }
      }
      *** END Changes ***
      else if (message.Type == ActivityTypes.ContactRelationUpdate)
      {
        // Handle add/remove from contact lists
        // Activity.From + Activity.Action represent what happened
      }
      else if (message.Type == ActivityTypes.Typing)
      {
        // Handle knowing tha the user is typing
      }
      else if (message.Type == ActivityTypes.Ping)
      {
      }
      return null;
    }
  }
}Now that we have our new bot changes up and running, let's deploy the web chat channel to your web page. You have a couple of different options, the first you can simply copy the iframe code from the Azure portal and embed that on you web page. The option we'll demonstrate is a slightly more involved approach and will use a button to open a new window pointing directly to the bot's web chat url. You can find the code below:
<!-- Use whatever CSS you want to style the button accordingly -->
<button class="start-bot-web-chat">Start Bot Web Chat</button>
// This example is using jQuery
$(document).ready(function() {
    $('.start-bot-web-chat').on('click', function() {
        // Don't forget to add your web chat secret key to the url below
        var chatURL = 'https://webchat.botframework.com/embed/chime-basic-bot-poc?s=YOUR_SECRET_HERE';
        window.open(chatURL, 'Chime Chat', 'height=600, width=625');
    });
});
In this example, we'll help you get started building a custom web client using the Direct Line API. To speed things up a bit, we've built a simple and lightweight Angular + Bootstrap 4 seed project designed to get you up and running. You can get to it at this GitHub page https://github.com/mhthompson86/angular-directline-webchat .
You need to either clone or fork this repo to get started. https://github.com/mhthompson86/angular-directline-webchat
$ git clone https://github.com/mhthompson86/angular-directline-webchat.git
Before anything will work, you must configure the project to use your bot's Direct Line secret key. To do this, copy the secret from your bot's Direct Line channel on the Azure portal and paste it into the directLineSecret.json file that can be located in angular-directline-webchat/src/app/directLineSecret.json.
{
    "directLineSecret": "YOUR_DIRECT_LINE_SECRET"
}
To make it easier for you, we created a settings.ts file that will contain some information that will get used in various places in the code. Just swap out the values for the ones you want. The settings.ts file can be located in angular-directline-webchat/src/app/settings.ts.
export const Settings = {
    bot: {
        // This must match your bot's ID from Azure...(activity.from.id)
        // Bot page on Azure portal > Application Settings > BotId in the App Settings table
        id: 'chime-basic-bot-poc',

        // this is what will be shown in the chat dialog
        name: 'Chime bot'
    },

    // this is what is statically shown to the user before anything arrives from the bot
    welcomeMessage: 'Welcome to Instant Chime',

    // the image used in the top left of the chat window
    logo: '../../assets/img/chime-red.png'
};
Test that you can connect to your bot by opening a a command prompt or terminal at the project's location and
running ng serve -o. (the -o flag opens the browser to localhost:4200 automatically)
If you are able to connect, then you are all set and you can start customizing the project however you see fit!

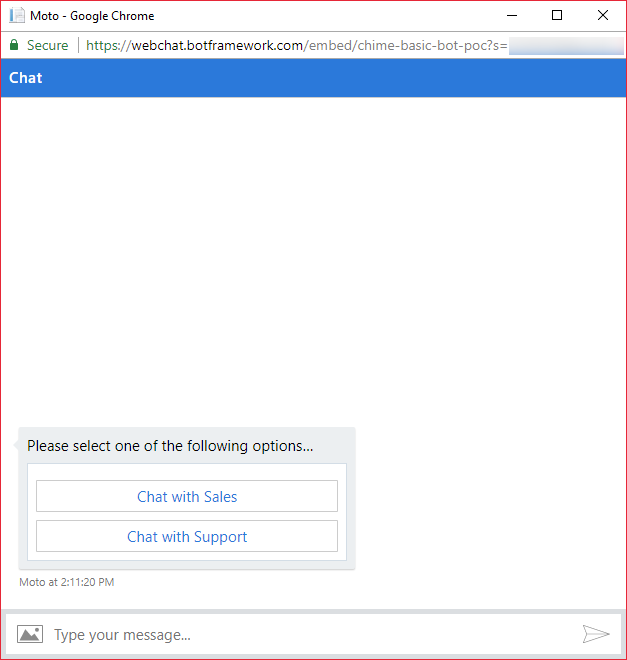 Bot Web Chat